Table of Contents
Eqonomize! has three different basic transactions types – expenses, incomes, and transfers.
Expenses represent a loss of money, a transaction where you give away money, mostly in return for something else. This can be a payment for products and services, or a gift.
Incomes represent a gain of money; when you are given money. This is when your at the other end of an expense, when you receive payment for products and services you provide (often as salary for your regular job), or when someone gives you money as a gift.
The third transaction type, transfer, represents neither a loss nor gain, but a transfer of money from one account to another. This can for example be when you withdraw money from your bank account as cash, or when you transfer money to a savings account. Loans, and loan payments reducing the debt, are also transfers (from a liability account to an assets account, and vice versa), even though Eqonomize! provides alternative methods for recording these.
Each transaction has a number of mandatory or optional properties. All the basic transactions have four mandatory properties – value, date, and from and to accounts/categories. Value represents the amount of money that is affected by the transaction, date when the transaction occurred, from account where the money was taken from and to account where money was put. These are the generic property names, which shows that all transaction types basically are the same.
For expenses the value is a cost, a positive value representing a loss of money, from the account that the expense is paid from, to an expense category. For incomes the value is an income, a positive value representing a gain of money, from an income category, to the account that the income is deposited in. For transfers the value is referred to as amount, or withdrawal (from an account) and deposit (to an account).
Table 4.1. Mandatory Properties
Generic | Expense | Income | Transfer |
|---|---|---|---|
Value | Cost | Income | Amount (withdrawal and deposit) |
Date | Date | Date | Date |
From Account/Category | Account (account) | Category (income category) | From (account) |
To Account/Category | Category (expense category) | Account (account) | To (account) |
All transactions do in addition have three optional properties. The description property provides information about the nature of the transaction. This can be considered a final level of categorisation (you get enhanced statistics and increased efficiency if you keep the description consise and without inflections, and reuse it for similar transactions).
The comment property is used for any additional information, not used for categorisation, about the transaction. If you for example buy a pair of shoes, you might create an expense in a clothing category, with the description “Shoes” and comments “Shiny red Pradas”.
The third property, associated file, allows you to specify a link to a file on the computer which will be connected to the transaction. This will typically be receipt, invoice or payslip, but any file can be selected. The file will not be moved, copied or modified. If the file is moved or renamed outside of Eqonomize!, the file will not be accessible from within the program.
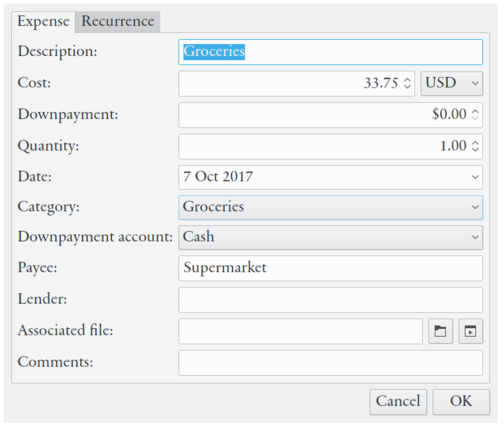
Expenses have two additional properties which can be shown or hidden using → (deactivating this option will not permanently remove any data from already entered transactions). The quantity property denotes how many entities was involved in the transaction. This can be a whole number, as in two CD's, or a fraction, as in 0.56 kg apples (units are not included). This property is by default set to 1 and does not affect the value (the value per entity equals value divided by quantity). The payee property represents the person or entity, for example the store where goods where bought, which receives the money. Incomes have a similar payer property, representing the one who gave you the money, for example your employer.
The transactions views show a list of expenses, incomes or transfers. By default all transactions (including scheduled transactions, shown in italics) up till and including the current date are shown, sorted in falling date order. The sort order can be changed by clicking the appropriate column header. Transactions with the same date are shown in the order they were entered.
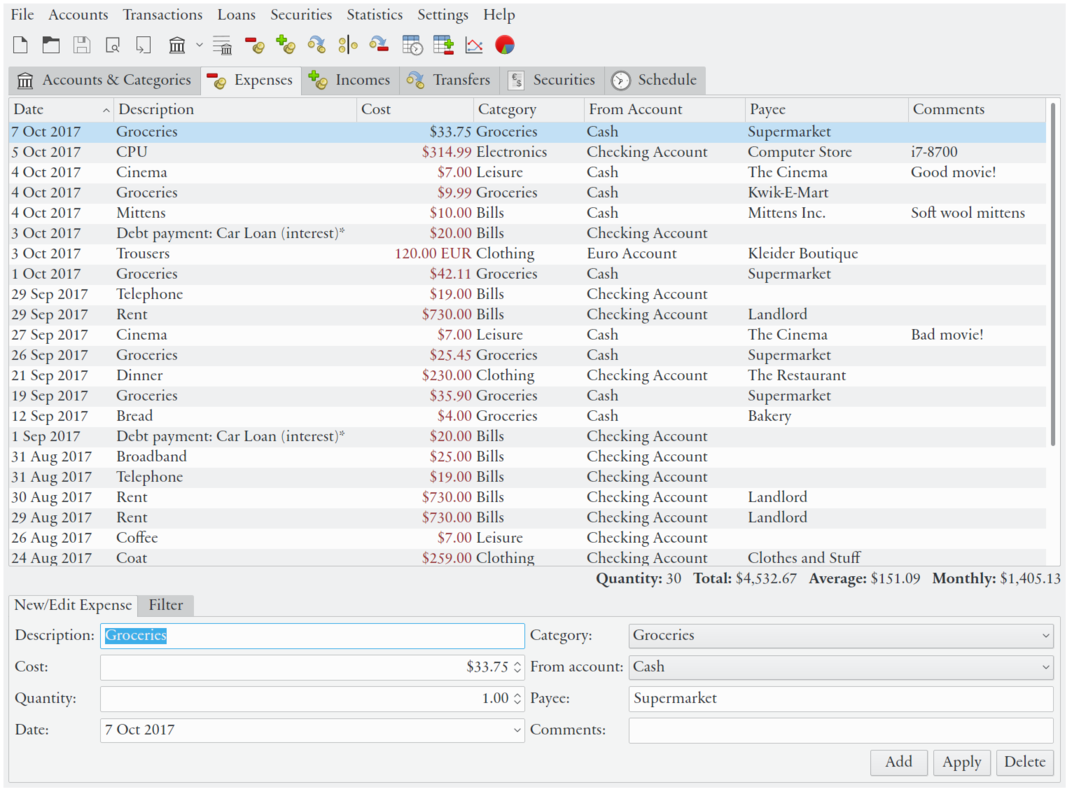
Statistics are shown immediately below the list. These numbers summarises all transactions currently in the list, unless two or more transactions are selected (in which case the numbers only refers to selected transactions).
Below the list of transactions is a section for filtering transactions. By default the tab for editing transactions is shown instead. To show the filter tab, click on Filter above the input fields. This enables you to select which transactions are shown in the list above.
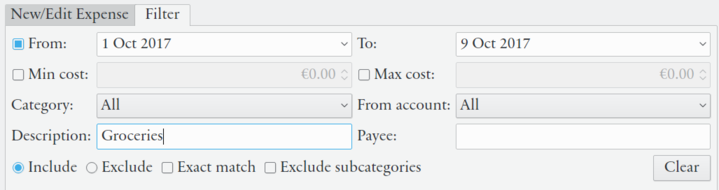
You can filter transactions based on date, value, account, category, description and/or payee/payer. Unless the exact match box is marked, text in the description and payee/payer fields will be matched against any part of the of the corresponding transaction properties, including comments in the case of the description field. You can opt to show all transactions that do not match (all) the filter criteria, by activating Exclude instead of Include.
New transactions can be entered in two ways, either with the new expense/income/transfer dialogs (accessed from context menus, the menu or the toolbar), or from the transactions views, below the transaction list. The edit a previous transaction either double-click the transaction (there are further options in different menus) or select (single-click) the transaction in the transactions view and change the values in the fields below the list. Notice that you have to press or the changes are lost.
Both the Enter key and the Tabulator key, on the keyboard, can be used to move to the next field. When in the last field of column (in the transaction edit dialog this is the last input field; in the transaction view this refers to both the date field and the comments field), the Enter key will however instead confirm the entered values (equivalent to pressing in the transaction edit dialog, or the button in the transaction view).
When entering a previously used description in the description field, all are other fields (except date) will be automatically filled with the values of the last transaction with the same description. This requires that the current value in the value/cost/income field is zero. If the description field is empty, the category and payee/payer fields exhibit a similar behaviour.
The input field for transaction values support basic arithmetic calculation. Addition, subtraction, multiplication, division and exponentiation are supported and uses standard order of operations (1+2*3 equals 7, not 9).

Currency conversion is also supported. Currencies will be converted to the currency of the currently selected account of the transaction. Note that the currency symbols used for conversion must be unambiguous. Symbols used for multiple currencies are not allowed (e.g. $ is used by many currencies, and you should therefor type USD instead for conversion from U.S. dollars), except for the main currency.
By default the value field uses the current currency as prefix or suffix. This can be omitted when entering a new value and is ignored when using currency conversion (expressions similar to “£5 €” are allowed).
If arithmetic or conversion have been used, the calculated expression is copied to the comments field, if empty.
It is possible to change the value of one or more properties of multiple transactions at the same time (e.g. if you want to move some transactions to a new subcategory). Select the transactions you want to edit in the transaction list and select from the context menu or the menu. A window will open with a list of properties that can be changed. The fields are prefilled with the values of the first transaction. Next to each property is a box for marking each property that will be changed. Properties with equal value for all selected transaction are marked for change by default. Enter new values for appropriate properties and click to make the change.
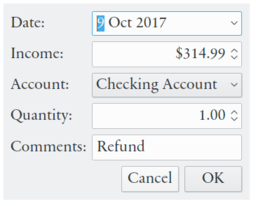
You should enter a refund instead of an income when you receive money as a refund for a previous expense. This can for example be if you return a product and get your money back, or if you buy a present that you and your friend will give to a mutual friend, and you receive your friends share of the cost later.
The create a new refund use → or the context menu with the refunded expense selected in the expense list. You will have to enter the amount of money refunded (initially set to full refund) and the date of the refund. In addition you should specify the product quantity returned by you. In the first expample above this is clearly 1, but in the second case this is less clear. It can either be 0.5 if you count it as a half product, or 0 if considered a whole gift (none returned). The use is more obvious if the quantity property is activated for all expenses and incomes. The refund is recorded as an expense with negative cost and quantity.
Repayments are similar tto refunds, but is used for incomes that you have been forced to repay.
Split transactions are used when a single transfer to/from an account is used for multiple transactions. This is not when money is withdrawn from a bank account through an ATM and you go shopping (that is first a transfer from a bank account to cash, then multiple regular expenses). A split transaction will for example be appropriate when you make a single payment for multiple products (especially if they are categorised differently), or when you pay with your credit card in a store and tell them to withdraw some extra money, which you get as cash in your hand.
It is up to you how and when you want to use split transactions. Multiple ordinary transactions can be used with the same end result, even though one way might represent reality better.
A split transaction can be created from scratch using → or from the context menu. It is however often more efficient to use the join action. This way you can enter transactions the usual way and later join them in a split transaction. Select the transactions to join and activate from the menu or the context menu, and enter a description. All transactions in a split transaction share a common date, account and payee/payer.
To reverse the action and transform transactions in a split transaction to ordinary transactions, select a split transaction and use .
In the transaction list (ledger) for the account associated with the split, the split will be shown as only one transaction, but everywhere else the parts of the split will appear as ordinary transactions. You cannot edit a transaction that is part of a split transaction directly from the fields below the transaction lists. Instead you should press to edit the whole split transaction, or double click the transaction in the list to edit the separate transaction (excluding the common date, account and payee/payer properties of the split transaction).
Expenses with multiple payments are similar to split transactions, but instead of using a common date and account, they share description, category, quantity and comments. The intended usage is for when multiple payments, primarily from different accounts, are made for a single product/service. They should not be used for payment plans/loans (although an expenses with multiple payments is created for expenses with downpayment).
Expenses with multiple payments can be created using the → or by selecting in the account menu for an expense.Expenses with multiple payments will show up as a single transaction in the expenses view, but as multiple transactions in the ledger. Similarly to split transactions they cannot be edited directly from the fields under the expenses list.
Note that even if you create a recurring expense with multiple payments where each payment has a different date, all recurrences after the first occurrence will use the same date for each separate payment. If a future date is set for the first, or only, occurrence, the program will only ask for confirmation of the expense on the first date.
An expense paid with loan is not actually recorded as a specific kind of transaction, but is a shortcut for creating a debt account and an expense with multiple payments (or a regular expense if downpayment is zero). Expenses with multiple payments can be created using the → or by selecting in the account menu for an expense.
Enter the usual expense properties (account excluded), an optional lender and optional value and account for downpayment (represents the amount of money you pay immediately).
Debt payments are a third kind of combined transaction. These group together repayment, interest and fees. Ordinary transactions can also be used for these purposes. Interest and fee are expenses and loan reductions are transfers.
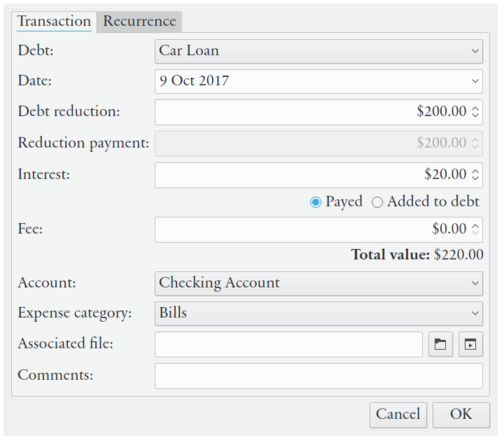
Debt reduction represents the amount you (re)pay that actually reduces the value of the debt. Interest represents the amount the debt has increased (before debt reduction) and may or may not be paid directly. Fee usually represents an administration fee added to each bill. You only need the enter one of the three values (the other can be zero).
→ also creates loan payment transactions but provides a simplified dialog when the debt has increased because of added interest.
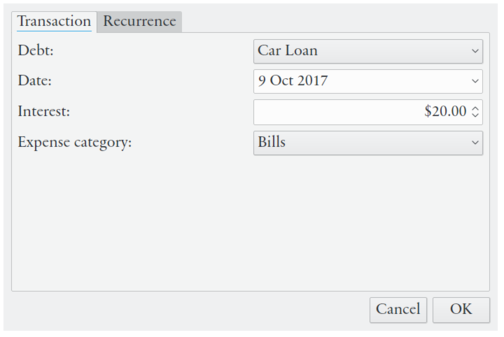
Transactions in a loan payment cannot be edited separately.
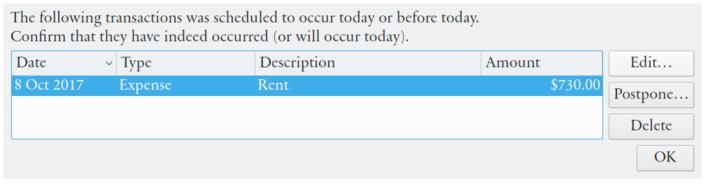
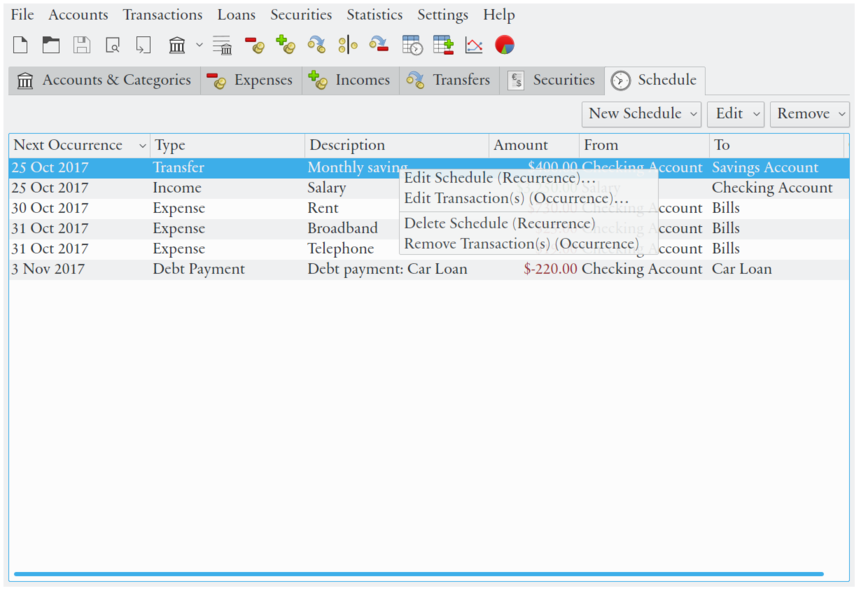
A scheduled transaction is a transaction that is planned to occur, and thus it has not occurred yet. It is basically just a transaction, of any type, that has a date set in the future. When a scheduled transaction has occurred, it becomes a regular transaction. Scheduled transactions makes it possible to keep track of and be reminded of future transactions. Eqonomize! will ask for confirmation when the transaction is expected to have occurred.
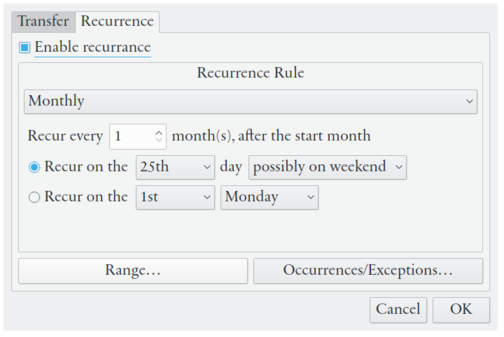
A scheduled transaction can be recurring, thus it will regularly occur on a certain date or with a certain interval. This is useful mostly for bills and salaries, which then need not be entered manually each time, and you can check Eqonomize! for upcoming payments. When a recurring scheduled recurring transaction has occurred, a regular transaction is created, the occurrence date is removed from the recurrence, and the scheduled transaction date is moved forward to the next occurrence. If you modify the properties of a recurring transaction, the previous occurrences will not be affected and vice versa. A scheduled transaction with no occurrences left is removed.
Single occurrence scheduled transactions are create just like ordinary transactions, except with a future date. Recurring transactions can only be created from the transaction dialogs (opened from the schedule view, toolbar buttons or menu items, or when double clicking a transaction), with recurrences specified in the second tab.
The next occurrence of each scheduled transaction is displayed in the schedule view. You can edit or delete either the single occurrence or all future recurrences. If a single occurrence is edited, it will be created as a separate transaction, and any changes made to recurring transaction will not affect this occurrence. If the date is changed to the current or a past date, the scheduled transaction becomes an ordinary transaction.
When a scheduled transaction is due, when the current date has gone past the date of the occurrence (or same date after 6 pm), Eqonomize! will ask you to confirm that the transaction really has occurred. You are then given the option to accept the transaction as it is, make some changes (for example the cost of your telephone bill might vary slightly), or postpone it. If the scheduled transaction is not postponed, it will become an ordinary transaction.